Radio Controlled Lawn Mower Build (updated after 5 years)
I am not responsible for the destruction of property or wildlife. Use sound judgement.
Table of Contents:
1 Parts List
2 Making it Go
3 Safety Concerns
4 Wiring Diagram
5 Frame
6 Mowing
7 Lessons Learned
8 Mk II Rebuild
9 Mk III Rebuild
This journey will require problem solving as well as trial and error. The below pictures of various builds during my own journey.
Parts List:
- Spektrum AR610 RC receiver - $29
- Spektrum DXe Transmitter - $60 ( I way overbought on this )
- Dimension Engineering 2x60A Motor Controller - $180 (first controller)
- Cytron SmartDriveDuo-60 (MDDS60) - $150 (much better second controller)
- Cheap Used Lawn Mower - $55
- Pride Jet 3 Ultra Wheelchair motors - $100
- Pride Jet 3 Ultra Wheelchair tires - $40 (buy these with the above to save time and headaches) Update - used the rims with better tires
- Large front caster wheels - $20
- Tons of Electronics. 12V to cigarette adapter, switches, wire, etc - $50
- Orange strobe light - $20
- Arduino Nano (actually a clone) - 5 for $20, so I guess $4 (update: not used)
- Sainsmart Dual Relay Board - $7 (update: not used)
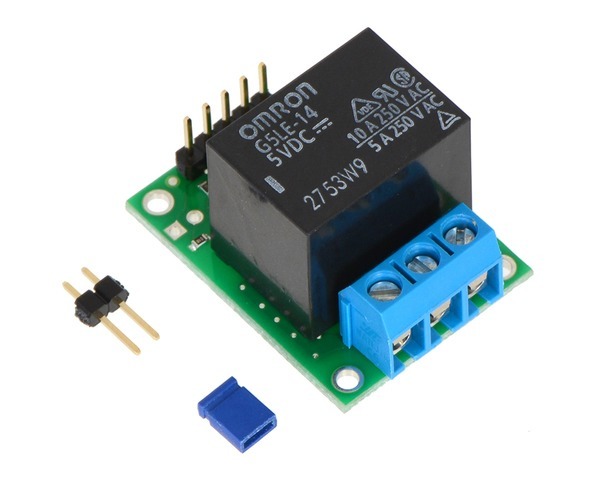
- Pololu RC Switch and Relay - $10
- Steel stock for the frame - $100
- Poulan Pro all steel deck lawn mower - $150
Always looking for a project, I decided to build an RC lawn mower. This project seemed to combine mechanical, electrical, and drone experience into one. The idea of mowing the grass from my porch while wearing a beer dispensing helmet always appealed to me.
Making it go:
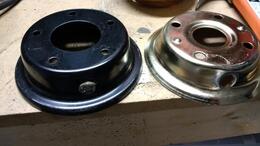
The very first thing that I purchased from eBay was the wheelchair Motors. I made the mistake of not purchasing matching wheels at the same time. This led to a few false starts attempting to match wheel hubs to the motors. In the end I ended up going back to eBay and buying the correct wheels from the same manufacturer for $40. The only modification I had to do to the wheelchair Motors was to remove the top covers, remove the brakes and cut the electric brake wires. This may sound scary, but while the device is in gear it doesn’t move unless powered.
To convert RC signals into motion, I used a Dimension Engineering 2x60 motor controller. This interfaces nicely with a standard RC controller (from Spektrum in this case). I had to mess with the dip switch settings to get the controls correct. Essentially it’s in RC mode, linear rate, and in mixed mode, not dual-stick tank steering. No additional programming was needed for the RC controller. Testing via a multimeter was helpful. While mapping from the RC transmitter to the Dimension motor driver.
Power is supplied by two RV/Deep Cycle batteries in a series. This puts out 24-25 volts of power. This thing is wicked fast and somewhat twitchy.
Safety Concerns
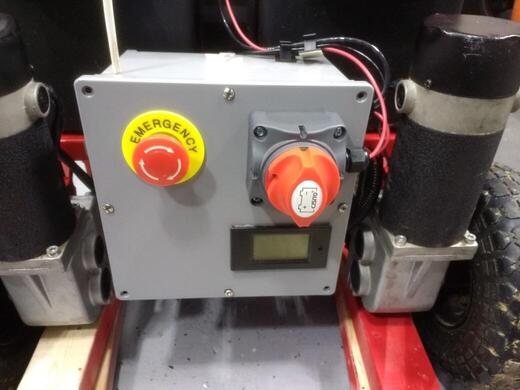
I wanted the gasoline lawn mower engine to shut off if A) I toggled a switch on the controller B) the transmitter was out of range or C) the transmitter batteries died. I wanted a setup that ‘failed close’ so that the default resting state of the system was to ground the mower’s magneto. This would short-circuit around the spark plug, and the mower engine would shutdown. For the engine to run, the controller had to be in-range, and the relays powered on.
Fortunately, I bought a RC transmitter with way too many toggle switches. After doing some testing with a multimeter, I found that the Gear toggle had a large delta between on and off, and could be read easily with the Arduino. I started by creating a basic program on the arduino, and playing with the input pins on the relay. These devices have a default closed or default open setting, I can’t remember if I had to reverse that while building this project. If the relay board is receiving a HIGH value, the relays are open.
The gasoline engine magneto had a spade connector which was originally used to ground the ignition system when the safety handle was released. All I had to do was run one wire from the magneto to one relay contact, and run the other relay contact to a bolt on the frame. To tie it all together, I used the Arduino program to monitor the value of the Gear signal, then send a HIGH value if we want to engine to run. If that signal goes away for any reason, the circuit collapses and grounds out the engine.
All of the above are sensitive electronics. I went through two iterations of project boxes to protect them. Arduino code found here. HOWEVER, IT DOES NOT WORK.
Everything worked on the bench perfectly, but when I attached it to the actual mower I had quite a bit of feedback and bouncing on the RC circuit. The readings would spike and dip, and the relays would chatter on and off. I tried various circuitry tricks like sinking to grounds and spent hours designing and redesigning electrical circuits and modifying Arduino sketch codes, with no luck. In the end I found a relay that interfaced with RC controllers. The Pololu RC Swich with Relay was worth every penny of $10, and I should have bought that FIRST. Works every time, and lets me shut down the gasoline engine remotely. When the relay contacts close, the ignition coil is grounded to the frame, bypassing the spark plug. So for the engine to fire up, the manual safety must be removed, AND the transmitter must be transmitting a good signal. Any form of failure with the power or RC signal causes the engine to shut off. My original solution was over-engineered. Example video below.
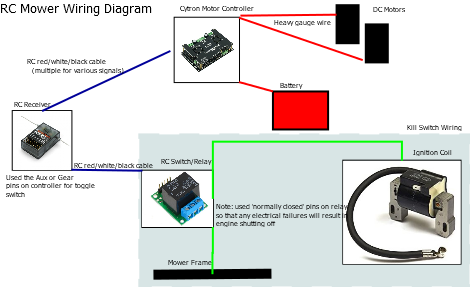
Wiring Diagram
I’ve recieved many requests to share wiring info, so I threw together a crude diagram to get people started. I leveraged the RC airplane controller to operate the motor controller and kill switch relays.
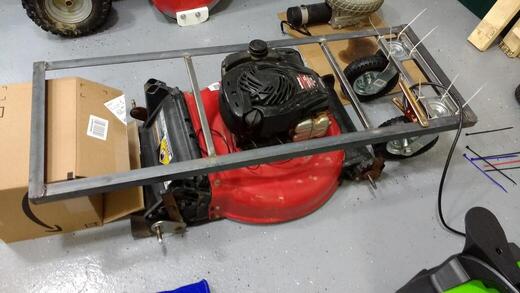
Creating the Frame
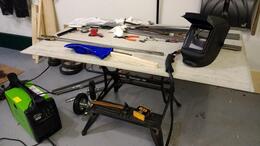
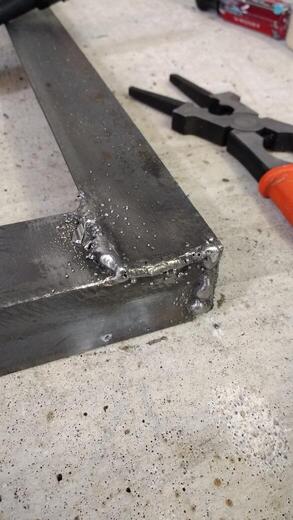
One of my most anticipated tasks needed to complete this project was the creation of the frame. I noticed that several RC mowers online made reference to outsourcing the welding - I was interested in doing this myself. My reasoning was that having someone else do the welding the first time around, I may save some money for the first incarnation, but if I needed to re-do any of the design, I’d quickly burn cash. Purchasing a welder and all needed accessories was about $250, and frankly, I REALLY wanted to add this kill to my toolkit. Also, as a side note - if you need a quick cheap and simple surface to do basic welding on, a $10 piece of concrete board works GREAT.
Purchasing steel stock at Home Depot at retail prices was surprisingly expensive. I know that other stores such as Tractor Supply sell steel stock, but I didn’t check their prices as a comparison.
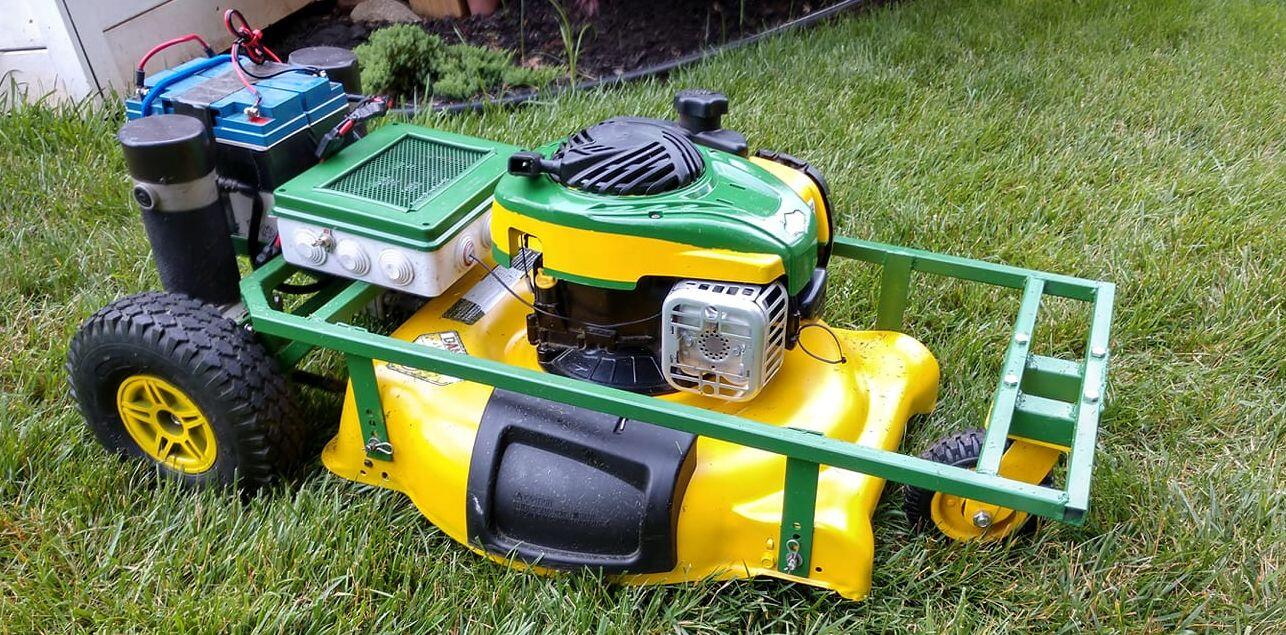
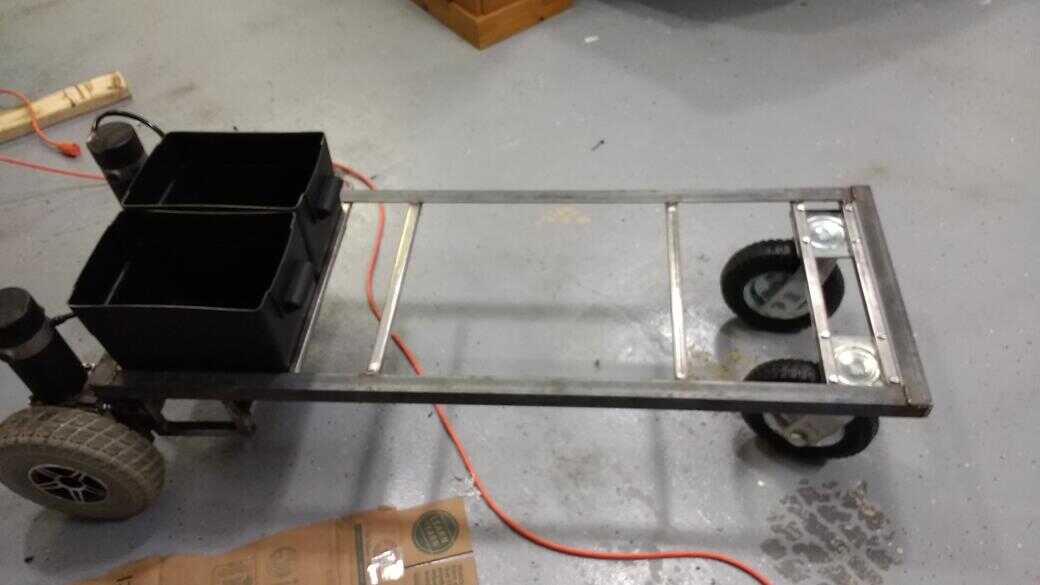
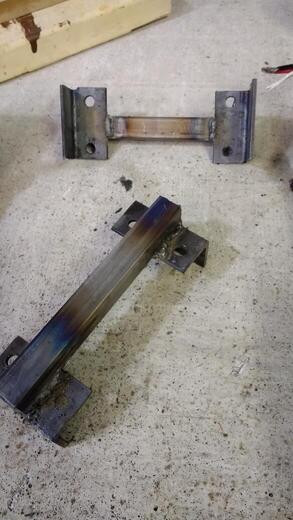
I used angle iron for the main frame, and used smaller box frame for the cross braces and battery compartment. One of the elements that I was most proud of was the creation of the rear axle in the brackets that hold the wheelchair motors. Essentially cut and drilled a piece of angle iron to create the motor mounts. These were then welded to the rest of the frame.
To lower the center of gravity, I recessed the battery boxes INTO the frame. This over complicated the build, and simply wasn’t necessary. Even with the batteries ‘on top’ of the frame, there’s no way this thing is tipping over. Having the recessed sub-frame lengthened the overall designed and hindered the mower deck placement. Update: move the batteries BEHIND the axles, better handling.
Motor brackets leveraged the existing screws on the motor, then welded to the frame.
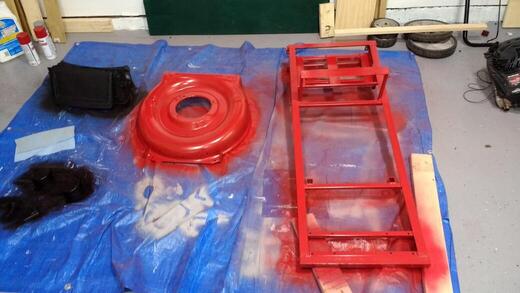
Once I had it all together, a quick coat of primer and ‘Toro Red’ spray paint from Tractor Supply. Makes it look less scary and more legit.
Mower Deck
For this, I looked for the most basic mower I could find. I figured this would make the conversion easier. I ended up with a 21 inch basic mulching mower. The original goal was to leverage the height adjustment levers and original axles. However, the mower had a lot of plastic junk on both the front and back. I removed the front, and found two metal tabs that were perfect to hang from. The rear of the mower deck was not so easy. I ended up cutting, glueing, and generally hacking the rear plastic section for hours. The resulting rear was screwed closed, filled with expanding foam, and painted with undercoating. Yeah, it was a mess. Next time, I’ll find an all-metal mulching only deck. The mower deck is suspended with adjustable turnbuckles. They seem to work well.
Actual Mowing
It works pretty well, I was surprised. After playing with some of the control settings on the motor controller, I was able to pretty consistently pilot the mower. I opted for a mulching-only mower, as I had no room for a bagging mechanism. Overall, I think I’ll enjoy mowing with this contraption.
Example videos below:
Lessons Learned:
- It could be smaller.
- It could be a good bit lighter.
- Using an all-metal mower deck would have saved time.
- I would redesign the rear of the frame with fewer parts.
- The battery boxes do not need to be recessed INTO the frame.
- Chains for traction may help on hills, I have some wheelspin.
- Remote electric start? Might be fun.</li>
Update 5/1/2017 - Tire Upgrade
The original ‘run flat’ wheelchair tires perform well on sidewalks and roads, but prove problematic on wet grass. They were standard rubber tires on the outside, with a foam core. These tires were rock hard, completely round, and would never go flat. I decided that knobby tires with tubes would be better, as I’d get more traction AND be able to lower the pressure within the tires, a good trick for driving a car in the snow. The Jet 3 Ultra scooter that provided the electric motors and axels did come with a pneumatic tire option, but wow, those rims were expensive, even second hand. I eventually determined that I could drill through one of the split-rims and provide access for a tire inflation stalk. The rim modification took all of 20 minutes and isn’t pretty but works. The tires and tubes were purchased from Harbor Freight for $10 each on sale, and were leftover from one of my first attempts to match hubs to the motors. With this setup, I can try many different tire options in the future. Update again: Kenda makes knobby tires in the right size that work great.

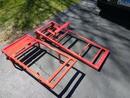
Update 4/22/2018 - One year later, new frame
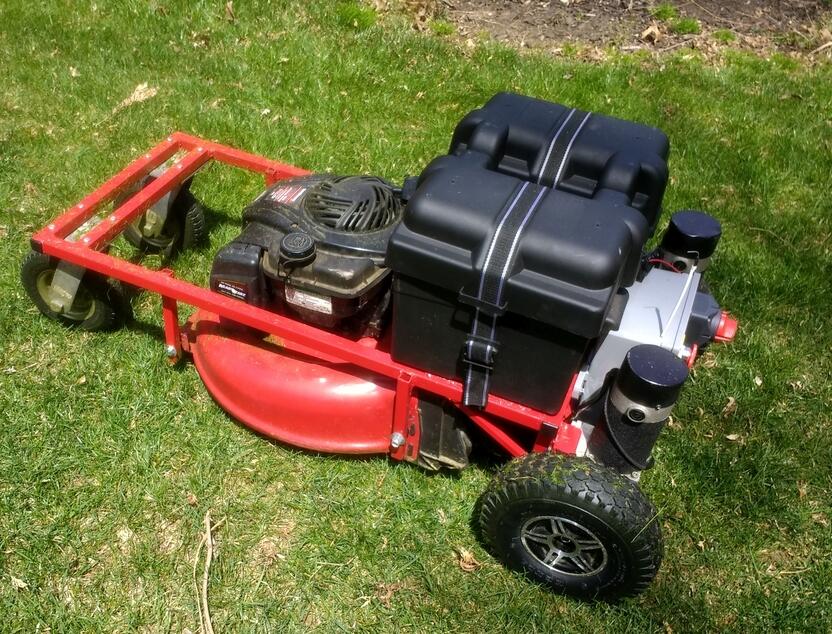
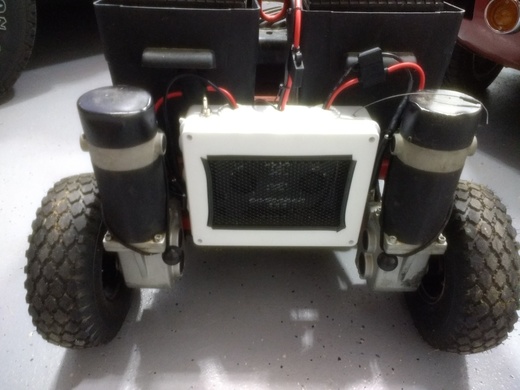
After a summer of mowing, I came to a few conclusions. The mower could have benefitted from being shorter and lighter. Having the wheels all the way in the back meant that more torque was needed to swing the frame around. Shifting all weight closer to the wheels helped quite a bit. I suppose moving some of the weight behind the wheels would help even more, but this new design is a good balance of weight distribution and compactness. Also, eliminating the recessed battery box shorted the frame quite a bit. Streamlining the electronics, putting them in a PVC enclosure and nestling them between the motors was a win on all fronts.
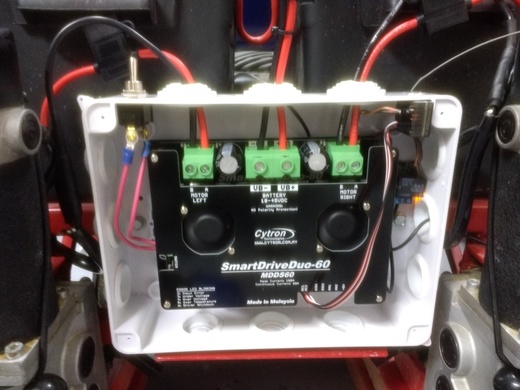
Update 7/1/2018 - Motor Controller Fire
While mowing grass, I noticed the controller seemed to be cutting out on a particularly hot July day. I powered down the mower, let it cool down, then tried to power it back on. When it didn’t respond, I began fiddling with wires, checking things with a multimeter, etc. It appeared that a lead on the motor controller itself was coming OFF of the printed circuit board. I’m not sure if it vibrated loose or was melting off of the board. I tried to reseat it, powered the unit back on for testing and poked at it. poof I had a few sparks then an electrical fire. The fire extinguisher stored in the shed was finally called into action.
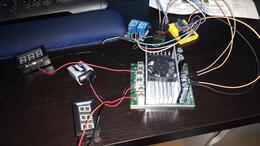
The next iteration, we’ll call it version 2.1, uses a Cytron SmartDriveDuo-60 (MDDS60). This unit seemed to have a few additional safety features, a design that fosters better airflow, and seem to be a a generation newer than the previous controller. Between ordering the controller and re-wiring everything I was back up and running in 12 days.
Update 7/3/2020 - Mk3
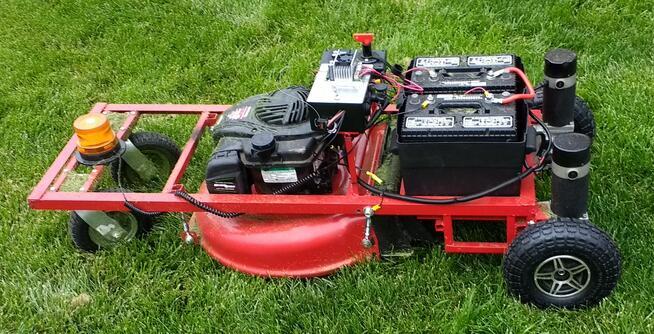
Much lighter frame, rear wheels brought in to match the deck width, and batteries behind the rear axles. The mower now handles WAY better. This will be the last build for a while.

On second thought, don’t build one of these.
If you have questions or comments, send them to ‘sclebo05’ -at- gmail